Kubernetes Meets WebAssembly: Lighter, Faster, and More Efficient?
As businesses increasingly adopt cloud-native applications, they encounter several obstacles that impact performance, resource efficiency, and security. Traditional containers, particularly those running full Linux distributions, often suffer from slow startup times, making them less than ideal for workloads that require rapid scaling. Additionally, even lightweight containerized applications require a complete runtime environment, leading to high resource consumption. Security is another major concern, as containers rely on the underlying operating system and shared system calls, increasing their attack surface.
To address these challenges, developers need a solution that offers faster execution, lower overhead, and better security—especially for workloads like edge computing, serverless functions, and microservices. But is there an alternative to containers that provides these benefits?
In this blog, we’ll explore WebAssembly, and we will walk through a hands-on guide on running a WebAssembly module on Azure Kubernetes Service (AKS).
What is WebAssembly (WASM)?
WebAssembly (WASM) is a highly efficient, low-level binary instruction format that was originally developed to bring near-native performance to web applications. Unlike JavaScript, which is interpreted, WebAssembly code is compiled ahead of time and runs inside a secure, sandboxed execution environment. While it was initially created for browsers, its lightweight and secure nature has made it an attractive technology for cloud, edge computing, and Kubernetes workloads.
WebAssembly is designed to be fast, portable, and secure. It runs in a virtual machine that is independent of the host operating system, which means that WebAssembly modules are platform-agnostic—they can execute on any architecture that supports the WebAssembly runtime. Unlike traditional containers, which rely on the host OS and its system calls, WASM operates in an isolated execution environment, reducing the attack surface and enhancing security.
How WebAssembly Works
WebAssembly code is compiled from languages like Rust, AssemblyScript, C, or C++ into a .wasm binary file. This file is then executed inside a WebAssembly runtime, such as Wasmtime, WasmEdge, or Wasmer, which provides the necessary execution environment.
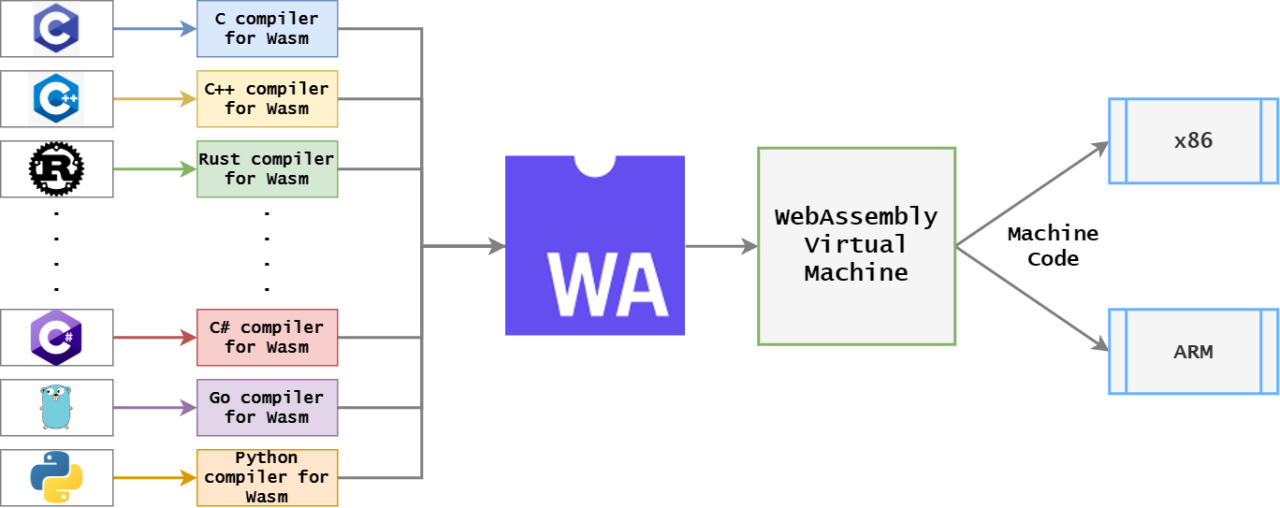
Instead of bundling an entire operating system and dependencies like a traditional container, a WebAssembly module contains only the compiled code and relies on a minimal runtime. This leads to significantly faster startup times and lower memory usage compared to containers. Moreover, WebAssembly’s sandboxed execution model ensures that applications cannot access system resources directly unless explicitly permitted through a controlled interface known as the WebAssembly System Interface (WASI).
WebAssembly and Kubernetes
Kubernetes, the dominant container orchestration platform, has traditionally been built around Docker and OCI containers. However, with the introduction of Fermyon Spin, Kubernetes can now seamlessly run WebAssembly workloads. Fermyon Spin provides a lightweight, fast, and secure runtime for executing WebAssembly applications, enabling them to be deployed and managed alongside traditional containerized workloads. By using Spin, Kubernetes clusters can efficiently handle both containerized and WebAssembly-based applications, opening the door to new possibilities in performance and scalability.
By leveraging WebAssembly in Kubernetes, organizations can achieve:
- Blazing-fast startup times for serverless and microservice applications.
- Reduced resource consumption, leading to lower infrastructure costs.
- Enhanced security by minimizing OS dependencies and system call exposure.
- Portability across different environments, including cloud, edge, and on-premise systems.
WebAssembly in Action
Let’s see how WebAssembly works in practice. Here’s an overview of what we’ll do:
- Set Up Your Azure Environment (Resource Group, AKS, and necessary permissions)
- Use AssemblyScript (a TypeScript-like language) to write a simple WASM module.
- Deploy the WASM module on Azure Kubernetes Service (AKS) using Fermyon Spin, a lightweight, serverless runtime for WebAssembly apps.
- Compare the performance of WebAssembly vs. a traditional containerized application.
⚠️ Note: This guide is for demonstration purposes and the covered configuration choices do not adhere to best practices for production scenarios.
Prerequisites
Before diving into the next steps, ensure you have the following prerequisites in place:
- Azure Subscription with Owner Permissions: You’ll need an active Azure subscription with Owner permissions to create and manage resources in Azure.
- Azure CLI: Install Azure CLI (version 2.57.0 or later) for interacting with Azure services from the command line. You can install Azure CLI by following the instructions at Microsoft’s official documentation.
- Kubectl and Kubectl Login: Ensure kubectl is installed no your system, along with kubelogin to log in to Azure Kubernetes Service (AKS) using Entra ID credentials. You can install kubectl and kubelogin by following the instructions in this documentation.
- Fermyon Spin: You’ll need to have Spin installed on your machine. You can install Spin by following the instructions at Fermyon Spin’s official documentation.
- NodeJS: You’ll need to have Node ≥= 18 installed on your machine. You can download it here.
- Visual Studio Code (optional): Have Visual Studio Code installed on your system for editing files and managing your project. You can download Visual Studio Code from here.
Set Up Your Azure Environment
Before deploying our WebAssembly module, we need to set up an Azure Kubernetes Service (AKS) cluster and ensure that we have the necessary permissions.
Step 1: Open your terminal and log in, using the az login command. After, set the correct subscription, by using the command below:
az account set --subscription "<your-subscription-id>"Step 2: First, create a resource group to organize our resources:
az group create --name wasmResourceGroup --location westeuropeStep 3: Next, deploy an AKS cluster:
az aks create --resource-group wasmResourceGroup --name wasmAKSCluster --node-count 1 --enable-addons monitoring --generate-ssh-keys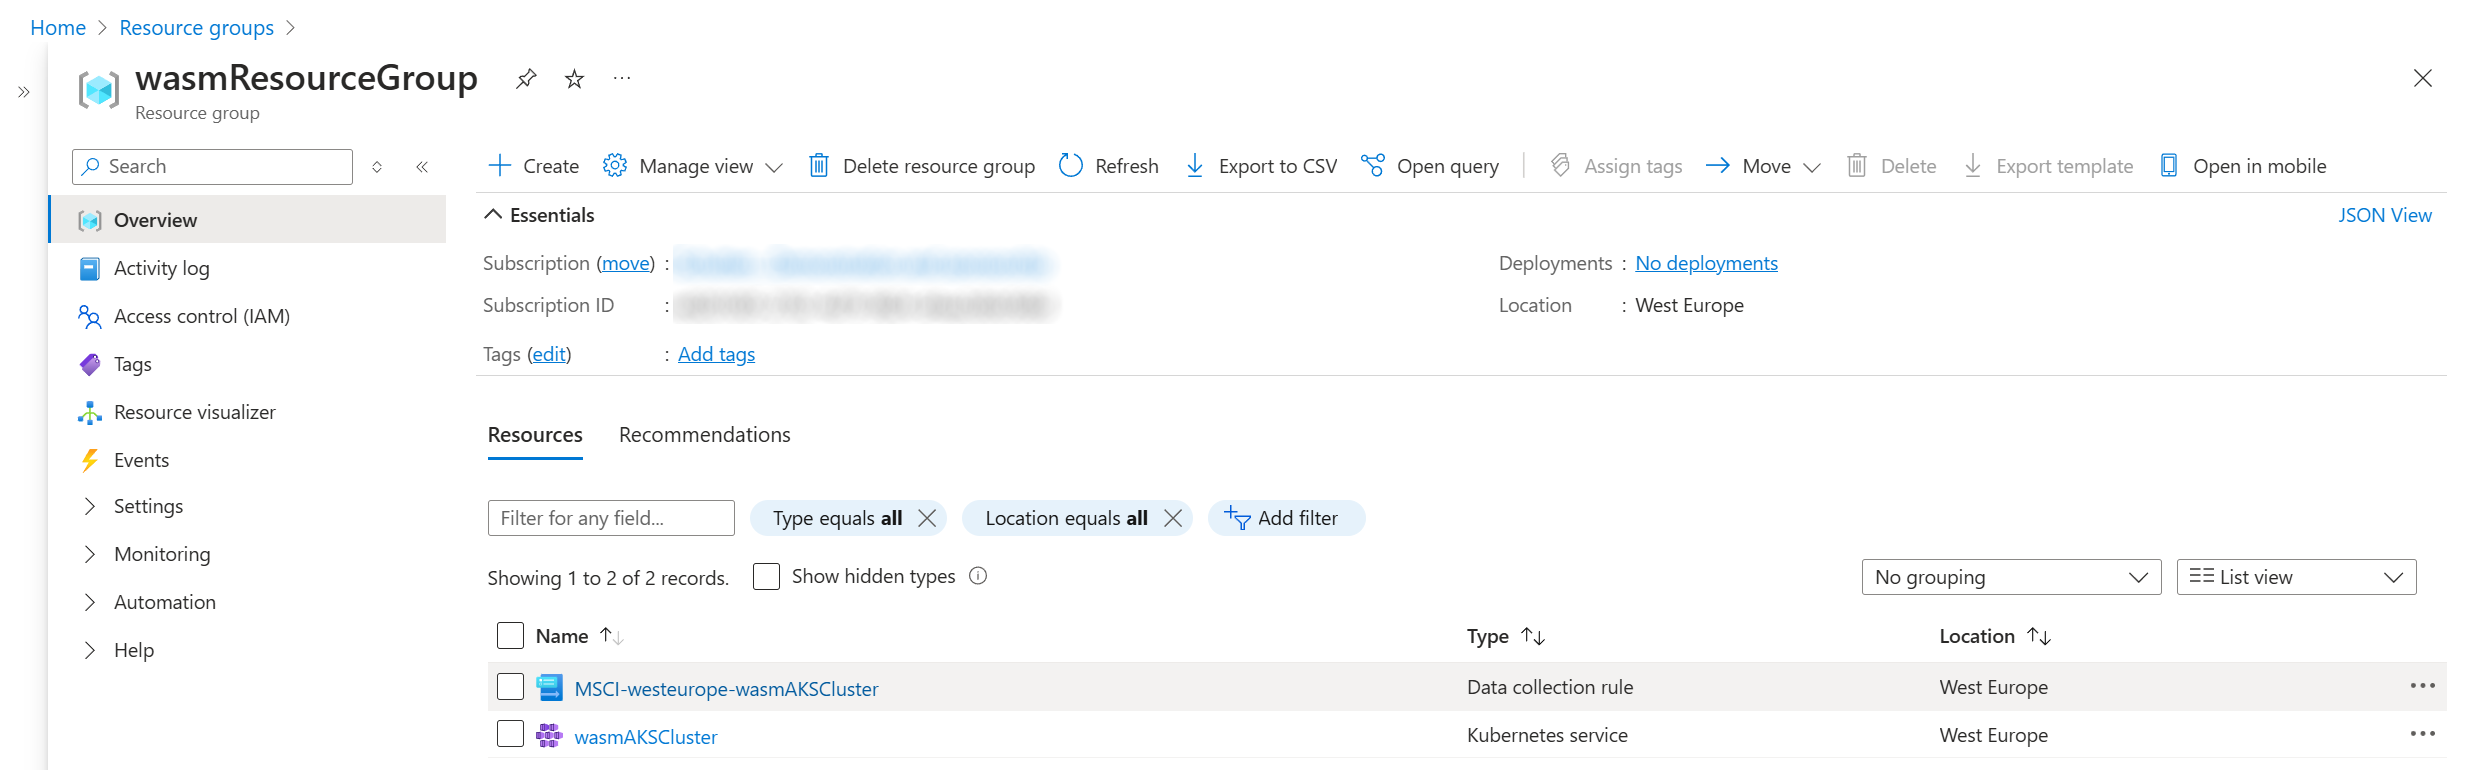
Step 4: Retrieve the cluster credentials so we can interact with it:
az aks get-credentials --resource-group wasmResourceGroup --name wasmAKSCluster
kubectl get nodes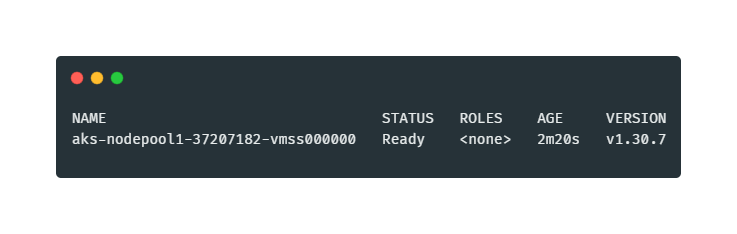
Write a WebAssembly Module Using AssemblyScript
Now, let’s write a simple WebAssembly module using AssemblyScript, a TypeScript-like language that compiles to WASM.
Step 5: First, install AssemblyScript:
npm install -g assemblyscriptStep 6: Create a new file add.ts with this simple function:
export function add(a: i32, b: i32): i32 {
  return a + b;
}
Step 7: Next, compile it into a WebAssembly binary. This will generate an optimized WebAssembly binary (add.wasm) that we can deploy to our Kubernetes cluster:
asc add.ts -o add.wasm --optimizeDeploy the WebAssembly Module on AKS Using Spin
Now, we will deploy our WebAssembly module to Kubernetes using Spin, a fast and lightweight framework for running WebAssembly workloads on Kubernetes.
Step 8: Let’s configure Spin to work with your AKS cluster by setting the necessary kubeconfig:
export KUBECONFIG=~/.kube/configStep 9: Let’s deploy the WebAssembly module using Spin. First, create a Kubernetes manifest file (wasm-deployment.yaml) that will deploy our WebAssembly module. Below is an example manifest:
apiVersion: apps/v1
kind: Deployment
metadata:
  name: wasm-example
spec:
  replicas: 1
  selector:
    matchLabels:
      app: wasm-example
  template:
    metadata:
      labels:
        app: wasm-example
    spec:
      containers:
      - name: wasm-container
        image: "wasmer/rust-and-cmake:latest"
        ports:
          - containerPort: 8080
        command: ["/bin/sh", "-c", "while true; do echo 'WebAssembly is running'; sleep 3600; done"]
        volumeMounts:
        - name: wasm-volume
          mountPath: /app
      volumes:
      - name: wasm-volume
        configMap:
          name: wasm-config
---
apiVersion: v1
kind: ConfigMap
metadata:
  name: wasm-config
data:
  add.wasm: |
    <base64-encoded add.wasm content goes here>
Step 10: Before applying the manifest, we need to base64 encode our .wasm file, so that we can embed it into the Kubernetes configmap. To encode your add.wasm file, run the command below:
base64 add.wasmThis will output a long string. Copy the entire output and replace <base64-encoded add.wasm content goes here> in your wasm-deployment.yaml manifest with this copied string.
Step 11: Now that your manifest is ready, apply it to your AKS cluster using kubectl:
kubectl apply -f wasm-deployment.yamlTo verify that everything has been deployed successfully, you can check the status of your pod and deployment by running the kubectl get pods and kubectl get deployments command. You should see a pod running with your WebAssembly module inside.
This will deploy the WebAssembly module and expose it on the specified port within your Kubernetes cluster.
Compare the Performance
Now it’s time to compare the performance of WebAssembly against a traditional containerized application. We’ll deploy a similar function using a Python container as a point of reference.
Step 12: Create a simple Python function and deploy it in a container:
kubectl run python-container --image=python:3.9 --restart=Never --command -- python -c 'print(5 + 10)'Step 13: Once deployed, measure the startup time of both the WebAssembly pod and the Python container with the command below:
kubectl get pods -o=jsonpath='{.items[*].status.startTime}'You should notice that the WebAssembly module starts significantly faster compared to the containerized Python function. This is due to the lighter runtime environment of WebAssembly compared to the full operating system required by traditional containers.
Deleting the Resources to prevent Ongoing Costs
Once you’re finished exploring, it’s important to clean up to avoid unnecessary consumption costs. You can easily delete the AKS cluster using the Azure CLI by following the steps below.
Step 14: Delete the AKS cluster:
az aks delete --resource-group wasmResourceGroup --name wasmAKSCluster --yes --no-waitStep 15: Delete the resource group:
az group delete --name wasmResourceGroup --yes --no-waitClosing Words
As we’ve explored in this article, WebAssembly offers a compelling alternative to traditional containers, providing benefits like faster startup times, reduced resource consumption, and improved security—all crucial for modern cloud-native workloads. With the power of Kubernetes, WebAssembly can be seamlessly integrated into your infrastructure, allowing for more efficient scaling and performance.
While this blog serves as an introduction, I hope it sparks curiosity and encourages you to experiment with this exciting technology in your own projects. If you’re interested in diving deeper, consider exploring additional resources:
Thank you for taking the time to go through this post and making it to the end. Stay tuned, because we’ll keep continuing providing more content on topics like this in the future.
Author: Rolf Schutten
Posted on: March 1, 2025