GitOps Best Practices for Azure: Managing Configuration Drift with FluxCD and Terraform
In the past, managing infrastructure meant manually applying changes, which often led to configuration drift. Configuration drift happens when the actual state of your environment (what is running in Azure) is different from the desired state (what is defined in your code repository). This drift is a major cause of instability, security issues, and deployment failures in complex scenario’s.
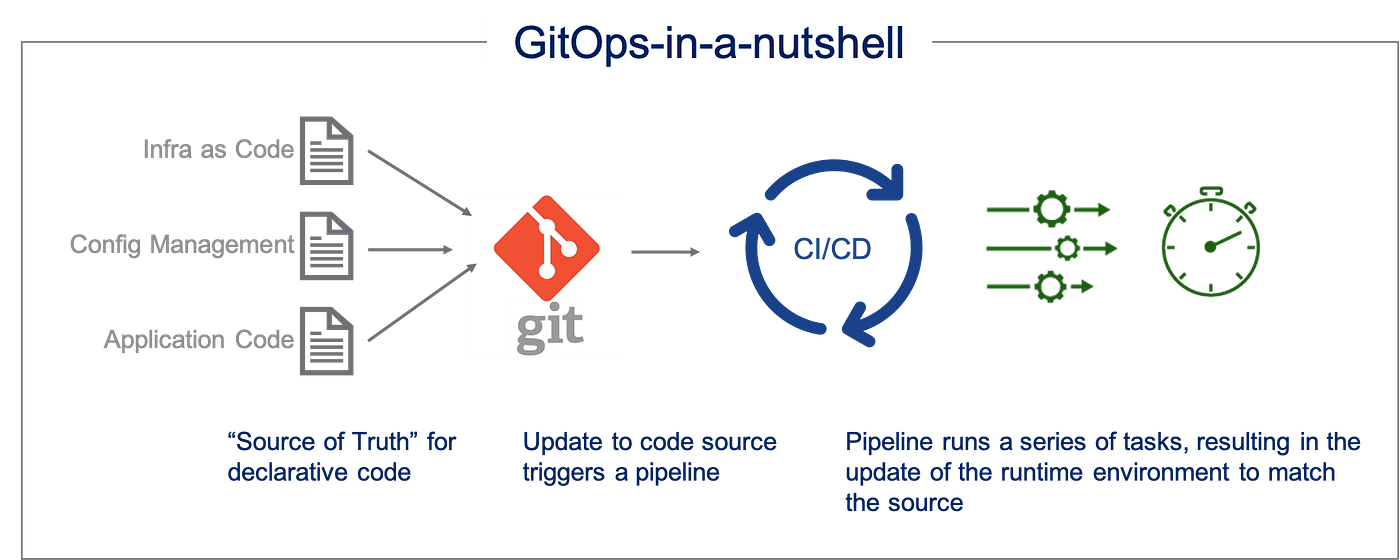
To overcome configuration drift, the industry has widely adopted the GitOps methodology. GitOps uses Git as the single source of truth for both your applications and your infrastructure. Instead of manually applying changes to your environment, you only modify your Git repository. An automated process then ensures that your live environment always matches the code in Git. This makes your infrastructure changes traceable, verifiable, and automatically reversible.
This article will guide you through setting up a powerful GitOps environment on Azure by combining two leading open-source tools: Terraform for defining the infrastructure (the Azure resources) and FluxCD for continuously syncing that infrastructure. We will focus on how this combination prevents configuration drift by making sure your Azure environment is continuously checked and reconciled against your Git repository. By the end of this article, you will have a robust pipeline where any unauthorized change made directly in Azure will be automatically undone, enforcing your desired state.
The GitOps Strategy: Preventing Configuration Drift
Configuration drift is the enemy of stability. When an engineer manually changes a setting on an Azure resource (for example, scaling an AKS cluster through the portal instead of through code), the environment becomes non-compliant. GitOps solves this by creating a reconciliation loop.
Why Terraform and FluxCD Together?
- Terraform: Defining the Desired State. Terraform is an Infrastructure as Code (IaC) tool that defines your Azure resources declaratively. It is excellent for provisioning resources like Virtual Networks, Storage Accounts, and the AKS cluster itself. Terraform establishes what the desired state is.
- FluxCD: Enforcing Continuous Synchronization. FluxCD is a leading GitOps tool that runs continuously inside your Kubernetes cluster. While it is primarily used for deploying applications, we will use its capabilities to also monitor and reconcile external resources (like the AKS control plane or VM-SKU settings) to prevent unauthorized changes. FluxCD establishes that the desired state is always applied.
By integrating FluxCD to manage the application of your Terraform outputs, you create a system where the running infrastructure is constantly validated against the configuration stored in Git, minimizing the chance of drift and making your entire deployment process much more reliable.
GitOps Best Practices and Setup Standards
For a reliable, enterprise-ready GitOps solution, just installing the tools is not enough. You must adhere to architectural best practices. This section outlines key design decisions in the GitOps world, explaining the approach used in this article with alternatives.
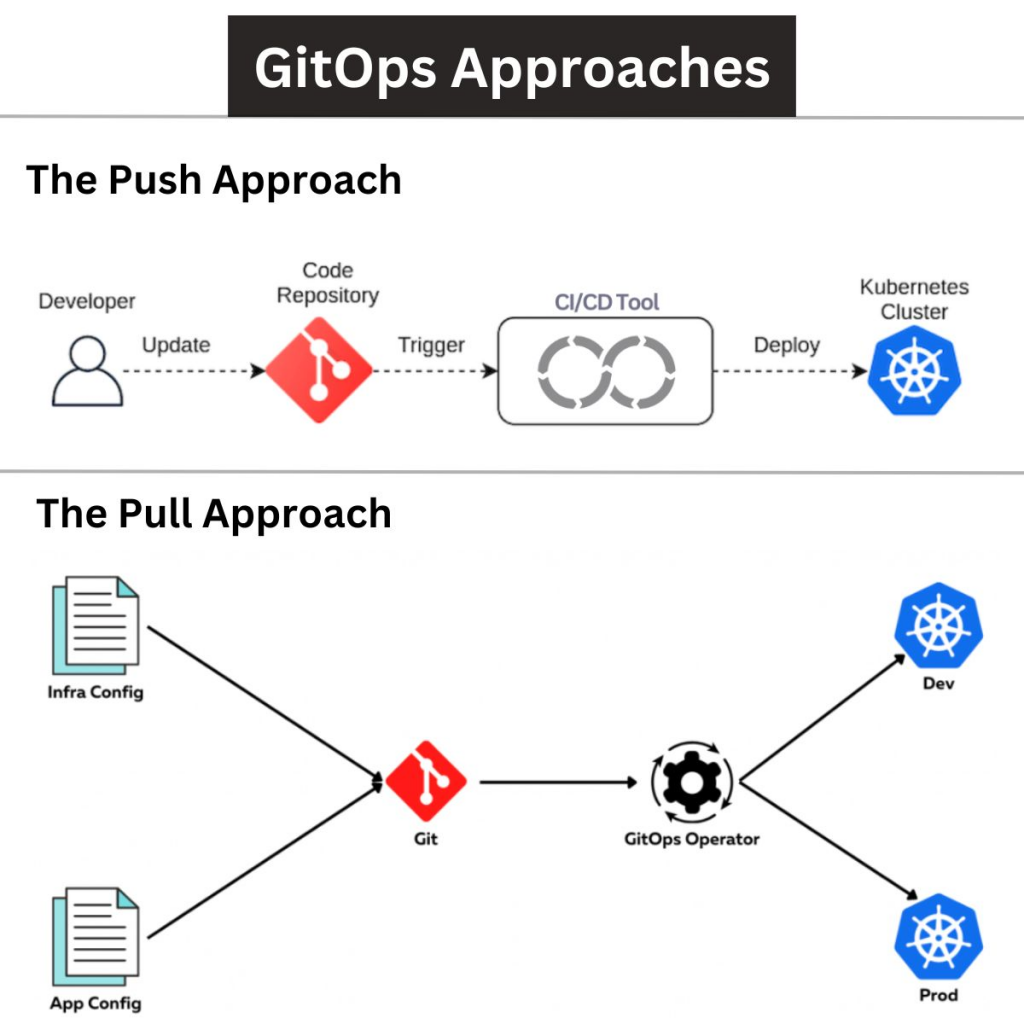
The Core Philosophy: Pull vs. Push
The most foundational design choice in GitOps is how changes are applied to the cluster:
| Practice | Description | Where Used |
|---|---|---|
| Pull-based (GitOps) | An agent (like FluxCD) runs inside the cluster, continuously pulling configuration from Git and applying it. | Recommended for Production. This is the approach we use. It is safer, as the cluster itself pulls only what it needs, and external CI/CD systems have no direct write access. |
| Push-based (Traditional CI/CD) | An external agent (like GitHub Actions) pushes configuration changes directly to the cluster API. | Simpler for Initial Deployments. Less secure for ongoing operations, as the external pipeline needs high privileges (kubeconfig) to the cluster. |
Repository Structure: Mono-Repo vs. Multi-Repo
How you organize your code repository affects scalability and security.
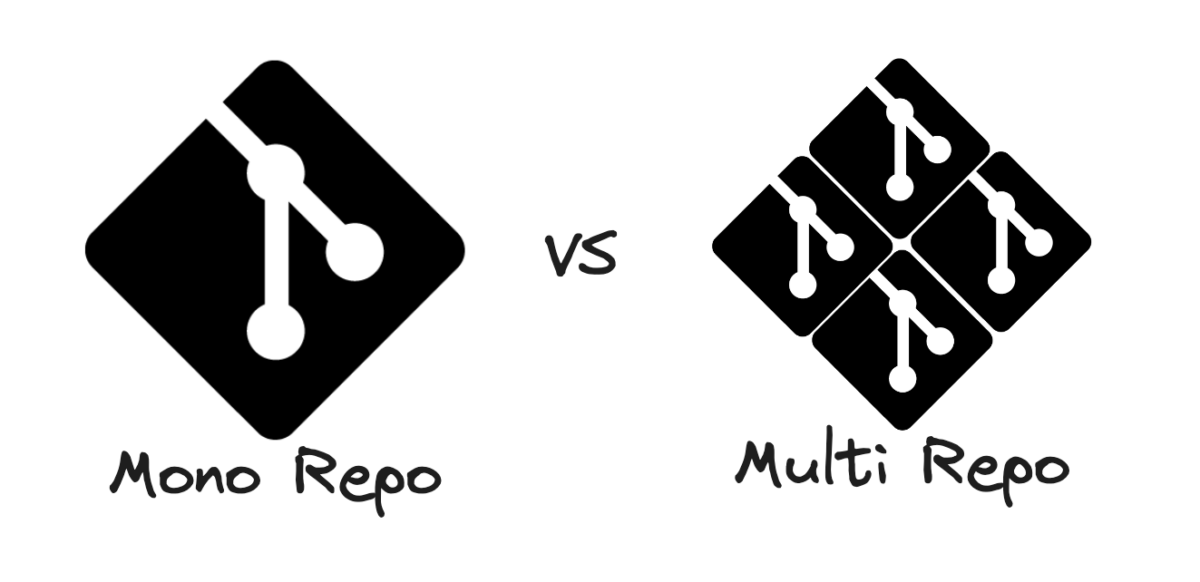
- Mono-Repo (Single Repository): One repository holds all configurations and applications (
infrastructure/,applications/,clusters/). We use a Mono-Repo structure for simplicity and demonstrating the cross-tool synchronization. - Multi-Repo (Multiple Repositories): Separate repositories for different concerns (e.g.,
infra-repo,dev-apps-repo). This offers clear separation of concerns, which is critical for large, multi-team environments.
Tooling Alternatieves for Reconciliation
While we use FluxCD and the FluxCD Terraform Controller, there are alternative open-source tools that achieve similar goals:
| Corncern | Used Tooling | Alternatives |
|---|---|---|
| Primary GitOps Agent | FluxCD | ArgoCD, Rancher Fleet |
| Infrastructure-as-Code (IaC) | Terraform (HashiCorp) | Pulumi, Azure Bicep |
| Infrastructure Reconciliation | FluxCD Terraform Controller | Custom scripts within an Argo Workflow, Crossplane (A powerful alternative that uses Kubernetes CRDs to manage external cloud resources). |
Dedicated Credentials for the Controller
The Terraform Controller needs permissions to modify Azure resources. It is a best practice to use a dedicated Service Principal or Managed Identity with the minimum required permissions (Least Privilege). This limits the “blast radius” if the controller is ever compromised. We will use a Managed Identity in this article.
Getting Started: Setting Up the GitOps Control Plane
It is now time to guide you through setting up the Azure resources, connecting your local environment, and installing the necessary command-line tools.
Prerequisites
Before diving into the next steps, ensure you have the following prerequisites in place:
- An active Azure subscription with permissions to create an AKS cluster and service principal.
- A personal or organization account on GitHub (or another Git provider) to host the configuration repository.
- A Personal Access Token (PAT) from GitHub with repo and workflow scopes (and authorized for your organization’s SSO, if applicable).
- Basic familiarity with the Azure CLI and Terraform.
- The Terraform CLI installed locally.
- The FluxCD CLI installed locally for bootstrapping the process.
- A local development environment, such as VS Code, for editing the IaC files.
Provisioning the AKS Cluster and Setting up Git
In this step, we provision the Azure resources and prepare the Git repository that will hold our desired state.
Log into Azure CLI:
az loginDefine your variables and create the resources:
RESOURCE_GROUP="rg-gitops-flux"
LOCATION="westeurope"
CLUSTER_NAME="aks-gitops-tf"

# Create Resource Group
az group create --name $RESOURCE_GROUP --location $LOCATION

# Deploy a basic AKS cluster with 3 nodes and Managed Identity
az aks create \
  --resource-group $RESOURCE_GROUP \
  --name $CLUSTER_NAME \
  --node-count 3 \
  --node-vm-size Standard_D2S_v3 \
  --enable-managed-identity \
  --generate-ssh-keys

# Get Kubernetes credentials and ensure the kubeconfig is fresh
az aks get-credentials --resource-group $RESOURCE_GROUP --name $CLUSTER_NAME --overwrite-existing
Set up a local Git Repository:
mkdir fluxcd-terraform-gitops
cd fluxcd-terraform-gitops
git init

# Create the required folder structure
mkdir infrastructure
mkdir clusters
Defining the Desired State (Terraform) and Pushing to Git
We now define the desired state for our AKS node pool, focusing on the minimum node count of 3 which we want to enforce as a drift guardrail.
Get Cluster ID:
Get the unique ID that is necessary for the Terraform-file.
CLUSTER_ID=$(az aks show --resource-group $RESOURCE_GROUP --name $CLUSTER_NAME --query id -o tsv)
echo "Using Cluster ID: $CLUSTER_ID"
Create Terraform file:
Create the file infrastructure/main.tf. Paste the cluster ID in this file.
resource "azurerm_kubernetes_cluster_node_pool" "core_pool" {
  name                  = "corepool"
  kubernetes_cluster_id = "${CLUSTER_ID}"        # Paste your Cluster ID here
  vm_size               = "Standard_D2S_v3"
  node_count            = 3
  min_count             = 3                      # Desired state guardrail
  max_count             = 5
  enable_auto_scaling   = true
}

# This data block is required for the Terraform Controller
data "azurerm_client_config" "current" {}
Commit and push to GitHub:
Connect your local repository with your remote GitHub repository and push the initial files. Replace the placeholders with your own values.
git add .
git commit -m "feat: Initial AKS node pool configuration with min_count=3"
git remote add origin https://github.com/azurebeastcom/fluxcd-terraform-gitops.git
git push -u origin main
Bootstrapping FluxCD and Installing the Terraform Controller
This is the important step to install the GitOps-agent and the Terraform Controller. We’ll use the most reliable HTTPS/PAT-method to bypass SSH issues.
Prepare authentication
Set your personal GitHub username and PAT as an environment variable.
# Replace [YOUR_PERSONAL_USERNAME] and [YOUR_PAT_TOKEN] with your own values
export GITHUB_USER="[YOUR_PERSONAL_USERNAME]"
export GITHUB_PAT="[YOUR_PAT_TOKEN]"
Bootstrap FluxCD:
Install the Flux-components on the AKS-cluster and configure the Git-connection. Make sure to replace the placeholders with your own values.
flux bootstrap git \
  --url https://github.com/azurebeastcom/fluxcd-terraform-gitops.git \
  --branch main \
  --path ./clusters \
  --username "$GITHUB_USER" \
  --password "$GITHUB_PAT"
ℹ️ Info: This command may freeze sometimes. However, the components are now installed. Press Ctrl+C to return to the prompt.
Fix internal cluster authentication
The Flux-components will now try to clone through SSH, which will fail. We’ll have to patch this to use HTTPS/PAT. Patch the GitRepository URL to change the URL from SSH to HTTPS. Make sure to change the placeholders to your own values.
kubectl patch gitrepository flux-system -n flux-system --type=json \
  -p='[{"op": "replace", "path": "/spec/url", "value": "https://github.com/azurebeastcom/fluxcd-terraform-gitops.git"}]'
Patch the secret to use PAT (Basic Auth):
We’ll inject the username and PAT into the secret.
kubectl patch secret flux-system -n flux-system --type=merge -p "
{\"data\": {
\"username\": \"$(echo -n $GITHUB_USER | base64)\",
\"password\": \"$(echo -n $GITHUB_PAT | base64)\"
}}
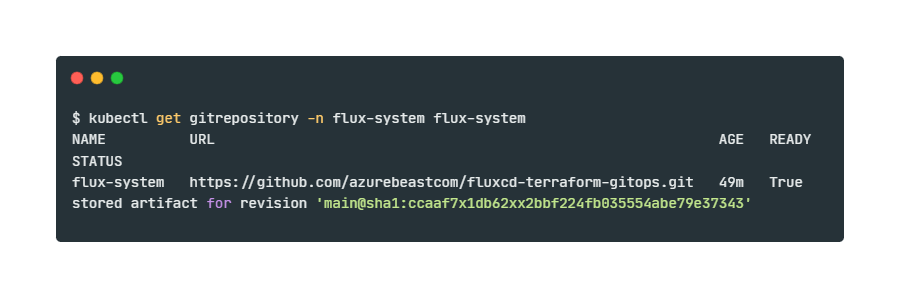
"Verify Reconciliation
Verify if the Flux Source Controller can succesfully clone the repository using the new HTTPS-settings.
kubectl get gitrepository -n flux-system flux-systemWait till the READY-status is set to True and the STATUS-notification confirms that the revision has been pulled. It should look like the example below.
Define the Terraform Execution Plan
Create the clusters/terraform-cr.yaml file. This file will tell the Terraform Controller what it should apply and how to authenticate.
apiVersion: infra.contrib.fluxcd.io/v1alpha2
kind: Terraform
metadata:
  name: aks-drift-reconciler
  namespace: flux-system
spec:
  interval: 5m # Check for drift every 5 minutes
  path: ./infrastructure
  approvePlan: "auto" # Automatically apply changes when drift is found

  # The source code repository
  sourceRef:
    kind: GitRepository
    name: flux-system

  # Authentication using AKS Managed Identity (recommended Best Practice)
  runnerPodTemplate:
    spec:
      serviceAccountName: default
      containers:
        - name: runner
          env:
            - name: ARM_USE_MSI
              value: "true"
Define Flux Manifests
Create the Flux Kustomization file clusters/kustimozation.yaml. This is the configuration that will tell Flux to apply the Terraform Custom Resource (CRD).
apiVersion: kustomize.toolkit.fluxcd.io/v1
kind: Kustomization
metadata:
  name: aks-drift-enforcement
  namespace: flux-system
spec:
  interval: 10m0s
  path: ./
  prune: true
  sourceRef:
    kind: GitRepository
    name: flux-system
  targetNamespace: flux-system
  # Reference the Terraform manifest to apply it
  resources:
    - ./terraform-cr.yaml
Commit and push the controller manifests
Push the configuration files to GitHub. The Flux Kustomize Controller will see the changes within a matter of minutes.
git add clusters/
git commit -m "feat: Add Flux Kustomization and Terraform CRD"
git push
Testing the Configuration Drift and Reconciliation
The Kustomize Controller will detect the new files, apply the terraform-cr.yaml, and the Terraform Controller will start to enforce the main.tf code.
Wait for the Terraform Controller installation
Check if the terraform-controller pod was started. This may take a while.
kubectl get pods -n flux-systemWait till the terraform-controller pod appears and has a Running state.
Check Terraform Planning
The Terraform Controller will now execute its first terraform plan and terraform apply to match the state in Azure with the Git-code (min_count=3).
kubectl get terraform -n flux-system aks-drift-reconcilerWait till the state has changed to Applied. This confirms that the IaC has been executed.
Introduce Drift Manually
Go to the Azure Portal. Navigate to your AKS Cluster. Under Node Pools, find corepool. Manually change the Minimum node count from 3 to 1 and apply this change.
Observe the Correction
Wait for about 5 minutes (interval: 5m). The Terraform Controller will detect the drift. Check the status to see how the correction will look like.```
kubectl get terraform -n flux-system aks-drift-reconcilerThe status will briefly change and return to Applied once the minimum node count in Azure is corrected to 3, solving the drift.
Closing Words
By combining the declarative power of Terraform for infrastructure definition with the continuous reconciliation capability of FluxCD, you have successfully implemented a robust GitOps model on Azure. You have moved beyond simply deploying infrastructure from Git; you now have an active control plane that automatically detects and corrects any manual deviations or configuration drift on your AKS cluster. This approach ensures your production environment always mirrors your code, improving stability, auditability, and reliability.
Thank you for taking the time to go through this post and making it to the end. Stay tuned, because we’ll keep continuing providing more content on topics like this in the future.
Author: Rolf Schutten
Posted on: November 9, 2025