Azure Automation Configuring Desired State Configuration
Before you can go into details of Azure Automation State Configuration (AASC), you should know what Desired State Configuration (DSC) and AASC is.
Desired State Configuration is a PowerShell management platform, used for managing the configuration of your IT infrastructure with configuration as code. DSC offers a declarative model for system configuration, allowing you to specify how you want an endpoint (workstation or server) to be configured, and leave the actual configuration to PowerShell DSC. In this way we only have to specify the “desired state”, and DSC determines how and in what order. AASC is similar to DSC, and allows you to write, manage and compile configurations, and import and assign configurations to target servers. Furthermore, AASC is a service that runs entirely in the (Azure) cloud.
In this guide, you will set up an Azure Automation Account and configure your first Desired State Configuration. When you’re finished, you will have the necessary skills to get started configuring desired states in your Azure tenant.
Prerequisites
Before you begin, you’ll need the following:
- An Azure subscription with access to an administrator account with sufficient permissions on the subscription, such as Owner or a role containing Microsoft.Automation resource authorization. If you do not have similar rights or a subscription, you can create a free account here.
- Visual Studio Code, or any other code editor you personally prefer. You can download Visual Studio Code for free here.
- Azure CLI. For Windows 10 users, I additionally highly recommend the Windows Terminal from Microsoft.
- PowerShell 7.x with the Azure PowerShell module installed.
Step 1 — Creating the resources
You’ll first create the necessary resources to manage and deploy a state configuration, create a virtual machine, and configure the virtual machine by deploying the desired state configuration.
Log in in to Azure
Log in to your Azure environment using the az login command in the Azure Cloud Shell from your Windows Terminal, Azure Portal or command line interface of personal preference.
Creating the resource group
All resources in Azure are hold by a container; a resource group. It is best practice to create a resource group for every solution that you want to manage as a group, and let it hold all the resources related to this. This is due life cycle management. For that same purpose you will be creating one resource group, that holds all the resources you will be creating for this guide. This makes it easy to delete all the resources (if you wish to do so), whenever you’re done with this guide.
Create the resource group by executing the following command. You can edit the parameters to your personal preference. The command below creates a resource group with “schuttencld-rg” as its name and the West Europe region as its location.
az group create \
	--name "schuttencld-rg" \
	--location "westeurope"
Creating the virtual machine
You’ll need a virtual machine to deploy your desired state configuration to. You can skip this part if you already have a virtual machine running Windows server as its operating system, and you are willing to use it for testing purposes. If you don’t have a virtual machine yet, you’ll have to create one. The command below creates a virtual machine with “schuttencld-vm” as its name, within the earlier created resource group, in the same region (westeurope), with Windows Server 2019 Datacenter as its operating system and the DS1v2 VM size. Change any parameters to your personal preferences and execute the command to create your virtual machine.
az vm create \
	--name "schuttencld-vm" \
	--resource-group "schuttencld-rg" \
	--location "westeurope" \
	--image "Win2019Datacenter" \
	--size "Standard_DS1_v2"
After executing the command you’ll be asked to give in an admin password twice.
Creating the automation account
Azure Automation (Desired) State Configuration is a feature within the Azure Automation service. For this purpose you will be creating an Azure Automation Account, using the command below. Again, you can edit the parameters to personal preferences.
az automation account create \
    --automation-account-name "schuttencld-aa" \
    --resource-group "schuttencld-rg"
    --location "westeurope" \
    --sku "Free"
Step 2 - Create the state configuration
You’ll now create the configuration file which contains the desired state configuration and compile it.
In this step you’ll be using PowerShell for the execution of your commands. Start off by executing the Connect-AzAccount command in PowerShell to connect to your Azure environment.
Creating the configuration file
You’re now going to write a desired configuration in a configuration file. Start Visual Studio Code (or any other code editor you prefer) and create a new PowerShell file. In the example I name this file “SchuttenCldConfig.ps1”, and save the file on my desktop.
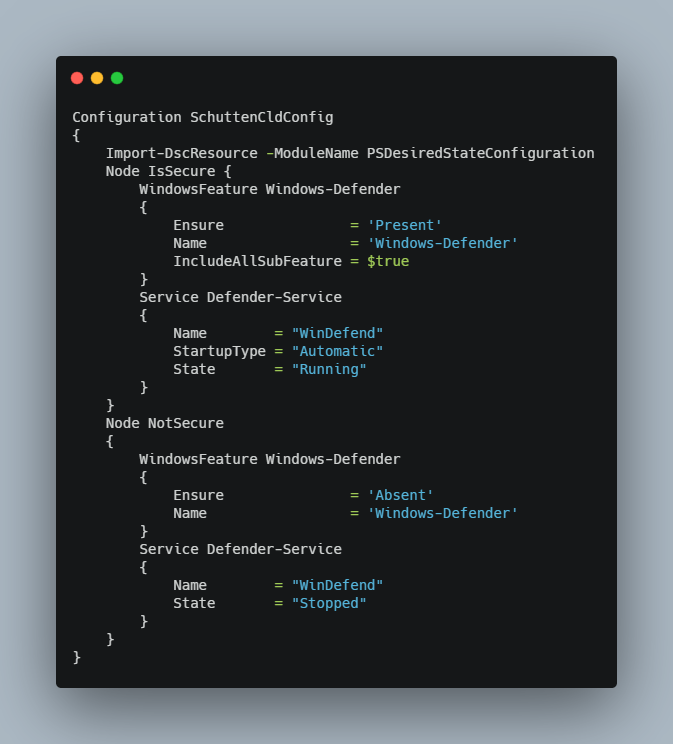
For educational purposes, we write a desired configuration that has the Windows Defender feature installed and running the Windows Defender service. We call this configuration state “IsSecure”. If the Windows Defender feature is not present, or if the Windows Defender service is stopped, it is “NotSecure”. The transcribed configuration file is shown below:

Importing the configuration file
Now you’re done creating the configuration file of your desired state, and you’ll need to import it into your Azure Automation Account. You can do so by using the “Import-AzAutomationDscConfiguration” PowerShell command. You can use the example below, but make sure you change the parameters to your personal preferences.
Import-AzAutomationDscConfiguration
	-SourcePath "C:\Users\Rolf\Desktop\SchuttenCldConfig.ps1"
	-ResourceGroupName schuttencld-rg
	-AutomationAccountName schuttencld-aa
	-Published
Compiling the configuration file
Once you’ve imported the configuration file, you’ll need to compile it. Again, you’ll use a PowerShell command to do so, as it is the easiest way to do it. Use the example command below, but make sure you change the parameters to your personal preferences, where the “-ConfigurationName” should refer to the name you gave your configuration within the configuration file (this name is displayed after the word “Configuration” on the first line of code within the file).
Start-AzAutomationDscCompilationJob
	-ConfigurationName SchuttenCldConfig
	-ResourceGroupName schuttencld-rg
	-AutomationAccountName schuttencld-aa
Compiling the configuration file can take a few minutes to complete. You can verify that the compilation was successful by using the command below, after you’ve changed it to your personal preferences.
Get-AzAutomationDscNodeConfiguration
	-ResourceGroupName schuttencld-rg
	-AutomationAccountName schuttencld-aa
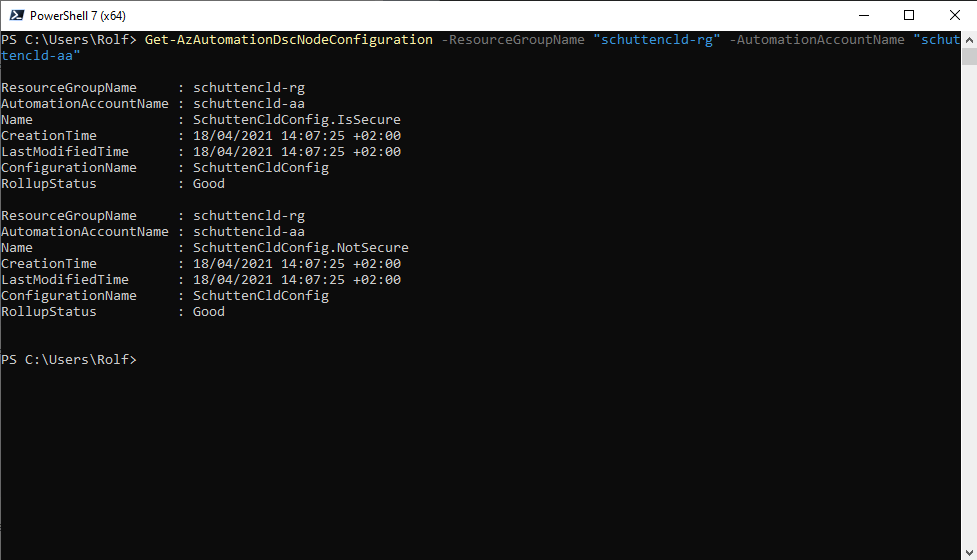
If running the above command doesn’t show any information as a result, there is no (successful) configuration compiled. If it was completed successfully, you should see something similar like the screenshot below as a result of running the command:

Step 3 - Register the virtual machine
In this last step you’ll register the virtual machine with the configuration. In this step you’ll again use PowerShell.
Register the virtual machine
Using the “Register-AzAutomationDscNode” PowerShell command, you’ll register your virtual machine to the earlier configured state configuration. You can use the example below, obviously after you’ve changed the parameters to your personal preferences.
Register-AzAutomationDscNode
	-AzureVMName schuttencld-vm
	-ResourceGroupName schuttencld-rg
	-AutomationAccountName schuttencld-aa
	-NodeConfigurationName SchuttenCldConfig.IsSecure
	-ConfigurationMode ApplyAndAutocorrect
	-RebootNodeIfNeeded $True
For the “-NodeConfigurationName” I could change its parameter to “SchuttenCldConfig.NotSecure”, if I want this system to have a “complaint” status without the Windows Defender feature installed and/or Windows Defender service running. Furthermore, for the “ConfigurationMode” you can also choose “ApplyOnly” and “ApplyAndMonitor” ApplyOnly would apply the configuration, but does nothing unless a new configuration is pushed to the target node, or when a new configuration is pulled from the service. ApplyAndMonitor, which is the default configuration mode if no value is given for this specific parameter, would do the same as “ApplyOnly”, and reports any discrepancy if the node drifts from the desired state. Lastly, there is the “ApplyAndAutocorrect” option, that we use in the example command above. ApplyAndAutocorrect would do the same as “ApplyAndMonitor”, and re-applies the desired configuration when discrepancy is reported.
Once you’ve successfully ran the PowerShell command, you have registered your virtual machine to the desired state configuration. To monitor the result and compliant state of your nodes, Microsoft developed a nice dashboard in the Azure Portal. You can find this dashboard under the “State configuration (DSC)” link within your Azure Automation Account.

From here you can click through on the displayed data, to get detailed information about the configuration, compliant state, etc.
Conclusion
This article introduced you to the basics of State Configuration (in Azure) by creating, importing, compiling, and registering a configuration file to a virtual machine. The configuration in this guide enforced the presence of the Windows Defender features, and a running state of the Windows Defender service. Now you can get started with writing desired configurations, and enforcing or monitoring them with State Configuration in Azure.
If you want to learn more about State Configuration, this Microsoft Docs page is a good place to start.
Author: Rolf Schutten
Posted on: June 9, 2021