Cost-Optimized Node Management: A Deep Dive into Karpenter on Azure Kubernetes Service
Running Kubernetes on Azure Kubernetes Service (AKS) gives a lot of flexibility, but it also brings cost responsibility. Nodes are one of the biggest cost drivers in most AKS clusters. If nodes are not managed well, you pay for capacity that your workloads do not really use.
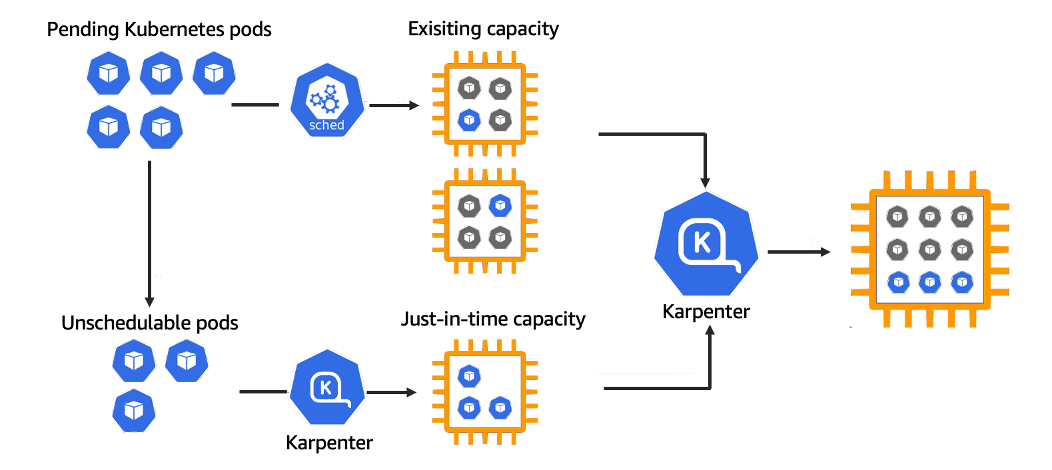
Karpenter is a Kubernetes node lifecycle manager that focuses on provisioning nodes based on pod requirements. Instead of scaling fixed node pools, it creates the right nodes at the right time. This makes it very interesting for teams working with FinOps principles.
In this article, you will first learn how Karpenter fits into the FinOps framework and why it helps with cost optimization. After that, you will configure Karpenter step-by-step on Azure Kubernetes Service and verify that it provisions nodes dynamically based on workload needs.
When you finish this article, you will have a clear understanding of Karpenter in a FinOps context, a working Karpenter installation on AKS, and a dynamic node provisioning setup that supports cost-efficient scaling.
Prerequisites
Before diving into the next steps, ensure you have the following prerequisites in place:
- An active Azure subscription with sufficient Azure permissions to create managed identities, role assignments, and VM resources.
- An existing Azure Kubernetes Service (AKS) cluster.
- Azure CLI installed and logged in.
kubectlconfigured to connect to your AKS cluster.- Helm installed on your local machine.
- A local development environment, such as VS Code, for editing the YAML files.
Understanding Karpenter in a FinOps Context
FinOps is about making cloud costs visible, controllable, and optimized. One of the core principles is take advantage of the variable cost model of the cloud. In Kubernetes, supplying resources is done through node capacity, based on the demand through workload resource requests.
Traditional AKS node pools often break this principle. You define a VM size upfront and scale the number of nodes, not the shape. This leads to unused CPU or memory and higher costs.
Karpenter changes this model. It observes unschedulable pods and creates nodes that match their exact requirements. This has several FinOps benefits:
- Less over-provisioning of resources
- Faster scale-down of unused nodes
- Better use of different VM sizes
- Easier use of Spot VMs for cost savings
Karpenter acts as a control loop between Kubernetes scheduling and Azure compute. This makes node cost a dynamic variable instead of a static decision.
In the next steps, you will configure this behavior in a real AKS cluster.
Preparing Azure Permissions for Karpenter
Karpenter needs permissions to create and delete Azure compute resources. To do this securely, it uses a managed identity.
First, create a user-assigned managed identity:
az identity create \
  --name karpenter-identity \
  --resource-group <your_resource_group>
This command creates an identity that Karpenter will use to talk to Azure APIs.
Next, assign the required role to the identity. Karpenter needs permission to manage VM Scale Sets and related resources:
az role assignment create \
  --assignee-object-id <identity_object_id> \
  --role "Contributor" \
  --scope /subscriptions/<your_subscription_id>
az role assignment create –assignee-object-id b089b1ad-375f-484f-8205-be56c6835edf –role “Contributor” –scope /subscriptions/4b8161f3-2832-4004-aa1b-1a3710db09bb
Make sure you replace the placeholder values with your own Azure details.
You have now prepared the Azure side for Karpenter. In the next step, you will install Karpenter in your cluster.
Installing Karpenter on AKS Using Helm
Karpenter is installed using Helm. First, add the Karpenter Helm repository:
helm repo add karpenter https://charts.karpenter.sh
helm repo update
Next, create a namespace for Karpenter:
kubectl create namespace karpenterNow install Karpenter with Helm. This example shows the most important configuration values for AKS:
helm install karpenter karpenter/karpenter \
  --namespace karpenter \
  --set serviceAccount.annotations."azure\.workload\.identity/client-id"=<identity_client_id> \
  --set settings.clusterName=<your_cluster_name> \
  --set settings.clusterEndpoint=<your_cluster_endpoint>
This command deploys the Karpenter controller and connects it to your AKS cluster using workload identity.
After the installation, verify that the Karpenter pods are running:
kubectl get pods -n karpenterYou should see the controller pod in a Running state.
In the next step, you will define how Karpenter is allowed to create nodes.
Creating a Karpenter NodePool and NodeClass
Karpenter uses NodePools and NodeClasses to describe what kind of nodes it may create.
Create a NodeClass that defines Azure-specific settings:
[label karpenter-nodeclass.yaml]
apiVersion: karpenter.azure.com/v1alpha2
kind: AzureNodeClass
metadata:
  name: default
spec:
  subnetSelectorTerms:
    - tags:
        karpenter.sh/discovery: <your_cluster_name>
  securityGroupSelectorTerms:
    - tags:
        karpenter.sh/discovery: <your_cluster_name>
  imageFamily: Ubuntu2204
Apply the NodeClass:
kubectl apply -f karpenter-nodeclass.yamlNext, create a NodePool that defines scheduling and cost-related constraints:
[label karpenter-nodepool.yaml]
apiVersion: karpenter.sh/v1beta1
kind: NodePool
metadata:
  name: default
spec:
  template:
    spec:
      nodeClassRef:
        name: default
      requirements:
        - key: kubernetes.io/arch
          operator: In
          values: ["amd64"]
        - key: karpenter.sh/capacity-type
          operator: In
          values: ["spot", "on-demand"]
  limits:
    cpu: "1000"
Apply the NodePool:
kubectl apply -f karpenter-nodepool.yamlKarpenter is now allowed to create nodes dynamically based on workload needs.
In the next step, you will test this behavior.
Deploying a Test Workload and Observing Node Creation
Create a test deployment that requests more resources than your current nodes can provide:
[label test-deployment.yaml]
apiVersion: apps/v1
kind: Deployment
metadata:
  name: scale-test
spec:
  replicas: 5
  selector:
    matchLabels:
      app: scale-test
  template:
    metadata:
      labels:
        app: scale-test
    spec:
      containers:
        - name: pause
          image: k8s.gcr.io/pause
          resources:
            requests:
              cpu: "2"
              memory: "4Gi"
Apply the deployment:
kubectl apply -f test-deployment.yamlNow watch the nodes being created:
kubectl get nodes -wYou should see new nodes appear that match the pod requirements. These nodes are created only when needed and will be removed when the workload is gone.
This demonstrates how Karpenter helps align capacity with demand.
Conclusion
In this tutorial, you implemented cost-optimized node management on Azure Kubernetes Service using Karpenter. You first explored how Karpenter supports FinOps principles by matching supply and demand. After that, you installed Karpenter, configured Azure permissions, and tested dynamic node provisioning with a real workload.
You can now build further by:
- Adding separate NodePools for different workload types
- Using only Spot VMs for non-critical workloads
- Integrating cost monitoring and alerts
Karpenter does not remove the need for FinOps practices, but it gives you better technical control to apply them in AKS.
Thank you for taking the time to go through this post and making it to the end. Stay tuned, because we’ll keep continuing providing more content on topics like this in the future.
Author: Rolf Schutten
Posted on: November 26, 2025