Introducing Kubernetes for Developers: AKS Automatic
Kubernetes has revolutionized the way organizations deploy and manage applications, serving as the backbone for modern container orchestration. However, as Kubernetes adoption grows, so do the complexities of managing clusters at scale. To address these challenges, Microsoft announced on May 21, 2024, the public preview of AKS Automatic — a next-generation Kubernetes solution designed to streamline operations and ensure production-readiness out of the box.
In this blog, we’ll dive into AKS Automatic, explore how it simplifies Kubernetes management, and examine its potential impact on developers and DevOps teams alike.
Azure Kubernetes Service (AKS) Automatic
Azure Kubernetes Service (AKS) Automatic is a new managed Kubernetes capability designed to simplify the deployment and management of Kubernetes clusters while maintaining the power and flexibility of Kubernetes. AKS Automatic is ideal for developers, DevOps engineers, and platform engineers who want to focus on developing and running applications without the complexities of managing Kubernetes infrastructure.
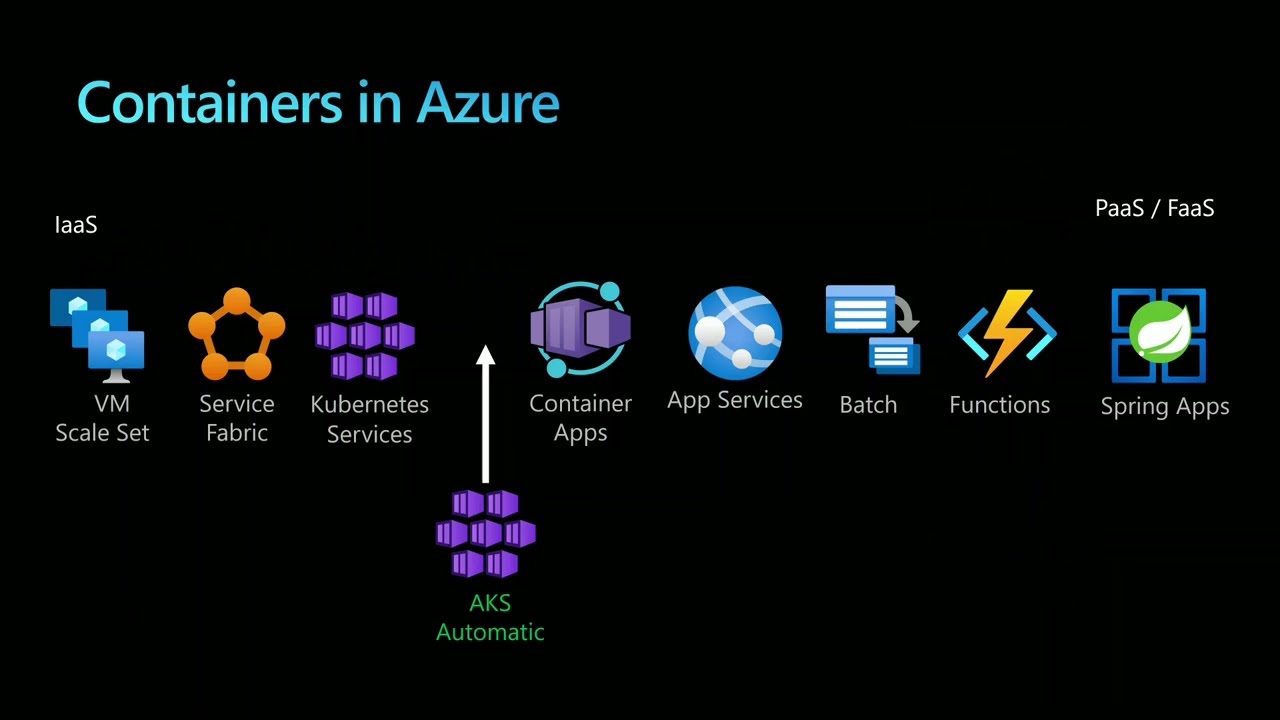
Below are its distinctive features and the benefits they provide for various scenarios.
Production-Ready Out of the Box
AKS Automatic delivers production-ready clusters with preconfigured settings for optimal performance, reliability, and scalability. It eliminates the need for manual setup by automating cluster configuration, including node management, scaling, and security configurations. This is particularly advantageous for running modern and AI applications requiring high availability and robust security.
Simplified Node Management and Scaling
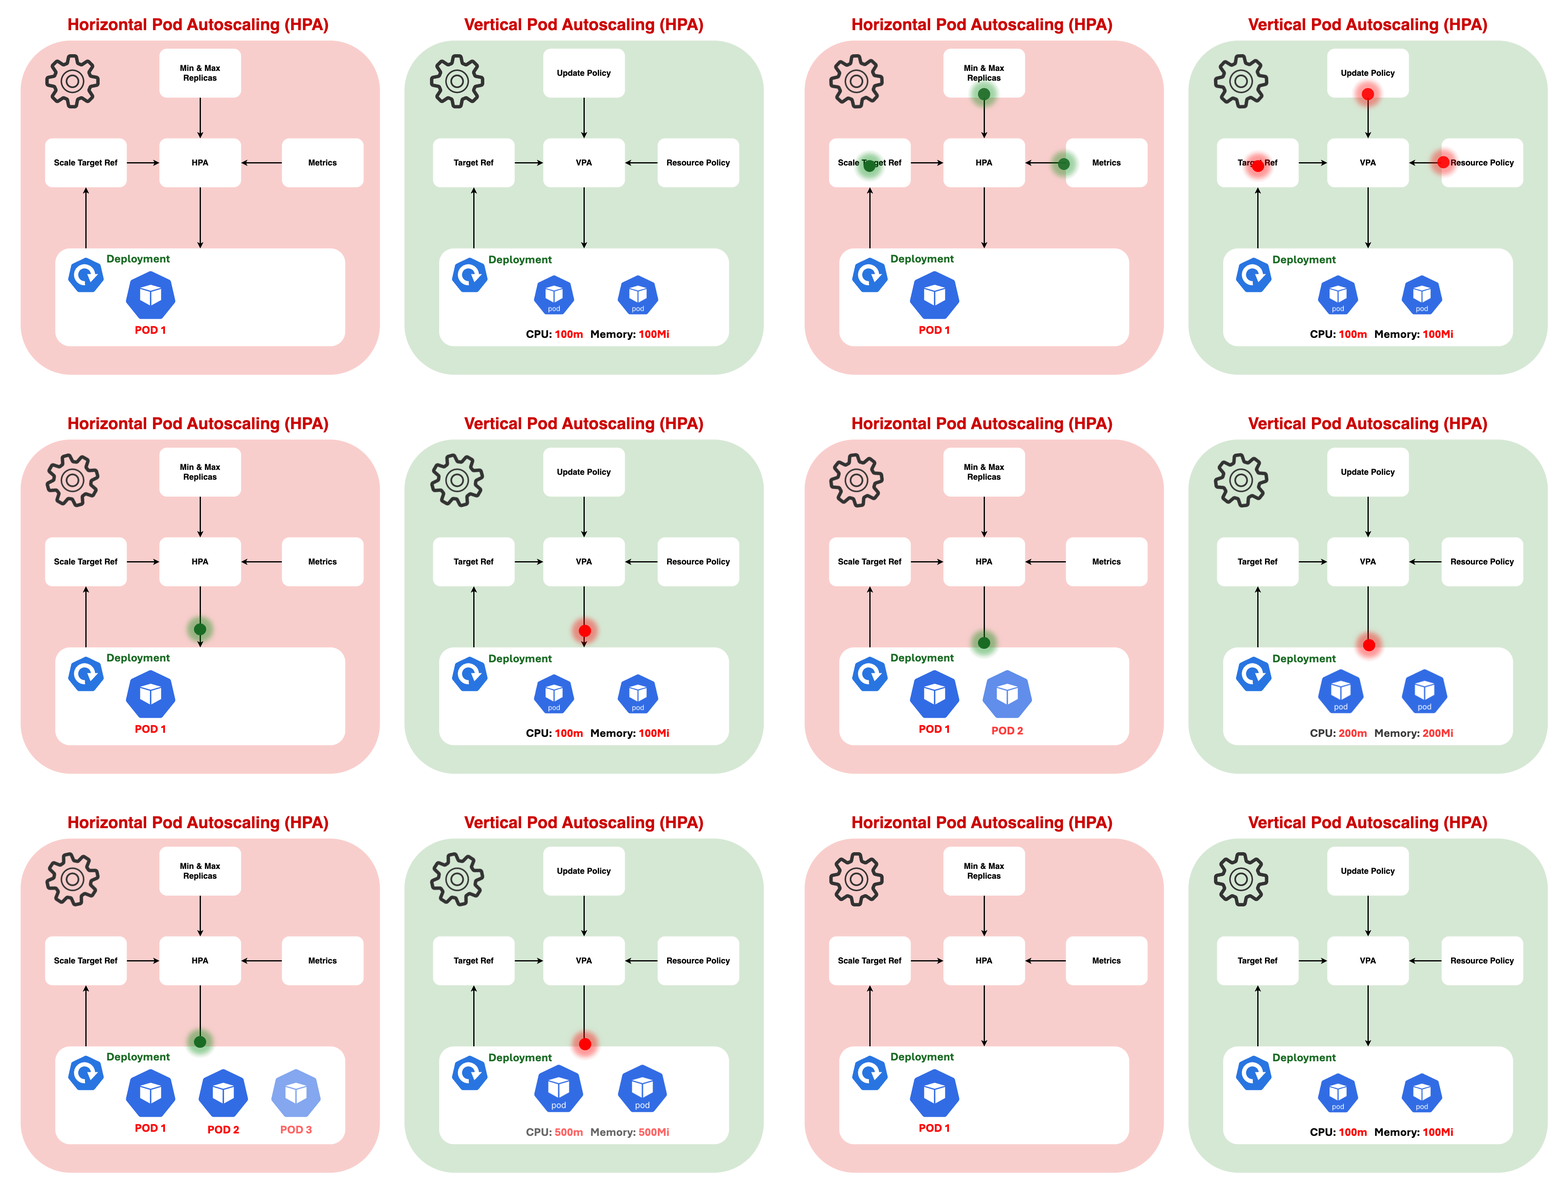
Node management is streamlined with features like Node Autoprovisioning, Horizontal Pod Autoscaler (HPA), Kubernetes Event Driven Autoscaling (KEDA), and Vertical Pod Autoscaler (VPA). AKS Automatic dynamically creates and scales nodes based on workload demands, ensuring efficient resource utilization and responsiveness.
Automated Upgrades and Maintenance
Clusters are configured for automatic upgrades and maintenance, reducing operational complexity. Features such as automatic detection of deprecated Kubernetes API usage and customizable maintenance schedules ensure clusters remain up-to-date, secure, and compliant with best practices.
Enhanced Security and Compliance
Security is a core focus of AKS Automatic. Clusters include built-in safeguards, such as deployment safeguards, network policies, and integration with Microsoft Entra for access control. Governance and visibility are enhanced with Azure Policy, Azure Monitor, and Azure Key Vault, making it easier to meet strict security and regulatory requirements.
Streamlined Application Deployment
Deploying applications is simplified through automated workflows that integrate source control, generate Kubernetes manifests, and establish CI/CD pipelines. This reduces the complexity of Kubernetes infrastructure, enabling developers to focus on application development and rapid deployment.
Comprehensive Monitoring and Observability
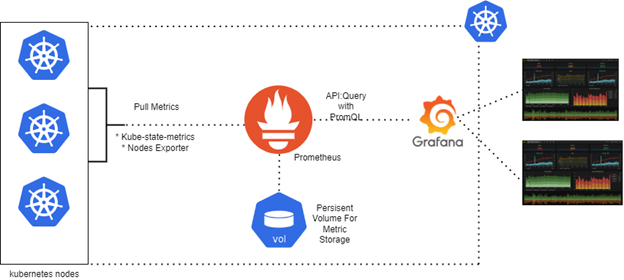
Monitoring and observability are handled through tools like Managed Prometheus, Managed Grafana, and Container Insights. These tools provide real-time visibility into cluster and application performance, ensuring efficient troubleshooting and operational insights.
Advanced Networking Capabilities
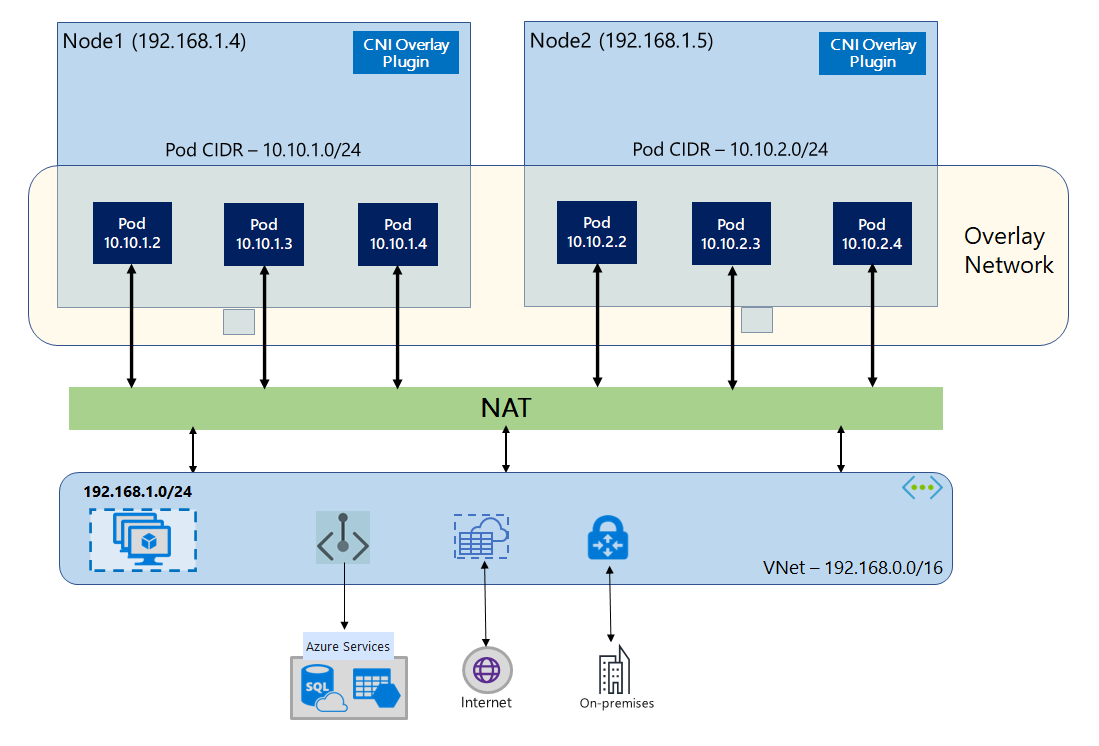
Networking in AKS Automatic is powered by a managed Virtual Network using Azure CNI Overlay with Cilium. Managed NGINX handles ingress traffic via the application routing add-on, while egress is supported by a managed NAT gateway. These features ensure high-performance networking with robust security, catering to organizations that require reliable communication between cluster nodes and external services.
Deploy an AKS Automatic cluster
Now that we’ve covered the basics of AKS Automatic, it’s time to get hands-on!
ℹ️ Info: At the time of writing, Azure Kubernetes Service (AKS) Automatic is in Public Preview. Azure Public Preview services are open to all customers with an active subscription but come with limitations. These services may lack full functionality, have stability issues, and no SLAs. They can be managed via Azure tools and may offer reduced or free costs during the preview. Production use is not recommended, and support may be limited.
In this section, we’ll go through a step-by-step guide for setting up an AKS Automatic cluster using Azure CLI.
Prerequisites
Before diving into the next steps, ensure you have the following prerequisites in place:
- Azure Subscription with Owner Permissions: You’ll need an active Azure subscription with Owner permissions to create and manage resources in Azure.
- Azure CLI: Install Azure CLI (version 2.57.0 or later) for interacting with Azure services from the command line. You can install Azure CLI by following the instructions at Microsoft’s official documentation.
- Kubectl and Kubectl Login: Ensure kubectl is installed no your system, along with kubelogin to log in to Azure Kubernetes Service (AKS) using Entra ID credentials. You can install kubectl and kubelogin by following the instructions in this documentation.
- GitHub account and GitHub CLI: Make sure you have an account at GitHub and have the GitHub CLI installed to interact with GitHub.
- Visual Studio Code (optional): Have Visual Studio Code installed on your system for editing files and managing your project. You can download Visual Studio Code from here.
Install the aks-preview extension
We’ll need the aks-preview Azure CLI extension version 9.0.0b4 or later. AKS preview features are optional and available for self-service opt-in. These features are offered “as is” and “as available,” with no guarantees under service-level agreements or limited warranties. While Microsoft provides partial support on a best-effort basis, these preview features are not intended for use in production environments.
Step 1: Open a terminal and log in to your Azure account using the Azure CLI:
az loginStep 2: Open up your terminal and use the following command to install the aks-preview extension:
az extension add --name aks-previewStep 3: To ensure you have the latest version of the extension, run this command to update:
az extension update --name aks-previewEnabling Feature Flags for AKS Automatic Preview
To access AKS Automatic while in preview, we’ll need to register specific feature flags.
Step 4: Run the following command to register the required feature flag for AKS Automatic:
az feature register --namespace Microsoft.ContainerService --name AutomaticSKUPreviewStep 5: Use the command below to check the status of the feature registration. It may take a few minutes for the status to change to “Registered”:
az feature show --namespace Microsoft.ContainerService --name AutomaticSKUPreviewStep 6: Once the status shows as “Registered”, refresh the Microsoft.ContainerService resource provider registration with the following command:
az provider register --namespace Microsoft.ContainerServiceCreate a resource group
Let’s create a resource group, serving as a logical container to deploy resources manage them collectively. When deploying AKS Automatic clusters, ensure the selected region supports at least three availability zones.
Step 7: Run the following command to create a resource group named myResourceGroup in the northeurope region:
az group create --name myResourceGroup --location northeuropeUpon successful creation, you will see output similar to the following: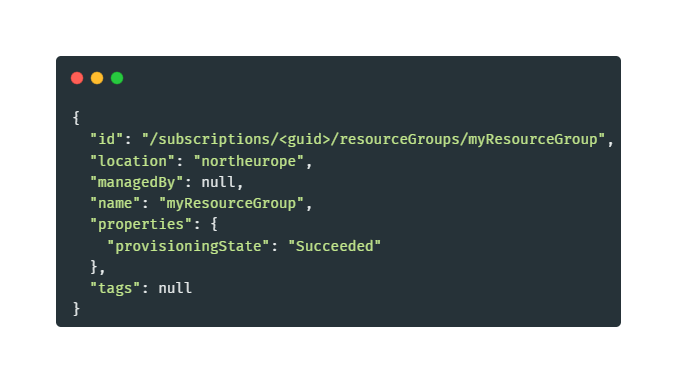
Create an AKS Automatic cluster
To deploy an AKS Automatic cluster, use the az aks create command. The following steps demonstrate how to set up a cluster with Managed Prometheus and Container Insights integration enabled.
Step 8: Run the following command to create a cluster named myAKSAutomaticCluster in the resource group myResourceGroup using the automatic SKU:
az aks create \
    --resource-group myResourceGroup \
    --name myAKSAutomaticCluster \
    --sku automatic
The command may take a few minutes to complete. Upon successful deployment, you’ll receive JSON-formatted output containing details about the cluster configuration.
With this step completed, your AKS Automatic cluster will be ready, configured with features like Managed Prometheus and Container Insights for enhanced monitoring and observability.
Connect to your AKS Automatic cluster
To manage the AKS Automatic cluster, we’ll use kubectl.
Step 9: Use the az aks get-credentials command below, to download the cluster credentials and configure kubectl:
az aks get-credentials --resource-group myResourceGroup --name myAKSAutomaticClusterSince AKS Automatic clusters use Microsoft Entra ID for Kubernetes role-based access control (RBAC), your user is automatically assigned Azure Kubernetes Service RBAC Cluster Admin roles when creating the cluster.
Step 10: Run the following command to list the nodes in your cluster and confirm the connection:
kubectl get nodesYou’ll be prompted to authenticate. Open a web browser, navigate to https://microsoft.com/devicelogin, and enter the provided code. After successful login, you’ll see output similar to this: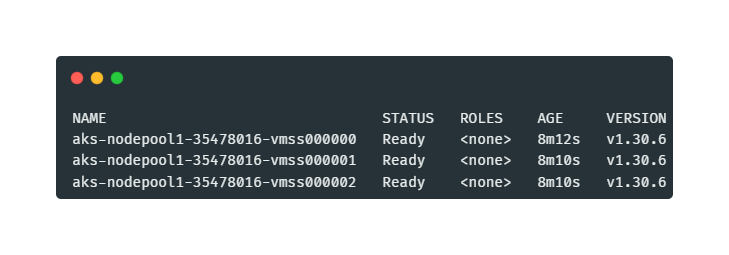
Ensure all node statuses are Ready before proceeding. At this point, your cluster is fully connected and ready for management with kubectl.
Deploying the Application
For this demonstration, we’ll deploy a Pokedex application covered in this blog article. To deploy it to the AKS Automatic cluster, we’ll use a Kubernetes manifest file. A manifest file defines the desired state of the cluster, specifying which container images to run and the associated configurations. The Pokedex application deployment includes various Kubernetes objects, such as deployments, services, and ingress rules.
Step 11: Begin by creating a dedicated namespace for the Pokedex application:
kubectl create ns pokedex-appThis namespace, pokedex-app, will isolate the resources for better organization and management.
Step 12: Deploy the Pokedex application using the kubectl apply command. The YAML manifest file for this deployment is available in the associated GitHub repository. Execute the following command to apply the manifest:
kubectl apply -n pokedex-app -f https://raw.githubusercontent.com/rolfschutten/pokedex-aks/refs/heads/main/pokedex-app-deployment.yamlUpon successful deployment, the output will list the created resources, including the deployment and service. Here’s an example of the output:
Access your Application
Once the Pokedex application is deployed, its front end is exposed to the internet via a Kubernetes service and ingress. This process may take a few minutes to complete. Follow the steps below to verify the deployment and access the application.
Step 13: Ensure all application pods are running before proceeding. Run the following command to check the status of the deployed pods in the pokedex-app namespace:
kubectl get pods -n pokedex-appIf this is the first workload deployed, node auto-provisioning may take some time to create a node pool to run the pods. Wait until all pods are in the Running state.
Step 14: Check the LoadBalancer service for the Pokedex application to find the public IP address. Retrieve the external IP:
kubectl get service pokedex-app-service --namespace pokedex-appStep 15: Open a web browser and navigate to the external IP address displayed in the EXTERNAL-IP field. This will load the Pokedex application, where you can interact with your deployed app.
Deleting the AKS Cluster and Preventing Ongoing Costs
Once you’ve finished exploring AKS Automatic, it’s important to clean up to avoid unnecessary consumption costs. You can easily delete the AKS cluster using the Azure CLI by following the steps below.
Step 16: Delete the AKS cluster:
az aks delete --resource-group MyResourceGroup --name myAKSAutomaticCluster --yes --no-waitStep 17: Delete the resource group:
az group delete --name MyResourceGroup --yes --no-waitClosing Words
As organizations increasingly rely on Kubernetes to power their modern applications, managing clusters efficiently and deploying applications seamlessly are critical for success. AKS Automatic, introduced by Microsoft and now in public preview, brings a new level of simplicity, automation, and production readiness to Azure Kubernetes Service. From automating cluster configuration and node management to simplifying application deployment with robust monitoring and networking, AKS Automatic empowers developers and operators alike to focus on innovation rather than infrastructure. Whether it’s deploying custom applications like the Pokedex app or leveraging the automated features to ensure secure, scalable, and compliant environments, AKS Automatic is designed to streamline the Kubernetes experience.
If you’re exploring ways to improve your Kubernetes workflows, AKS Automatic offers an excellent starting point with its emphasis on simplicity, security, and out-of-the-box production readiness. To learn more about and to continue your journey with AKS Automatic, you can start with reading some of the resources below:
Thank you for taking the time to go through this post and making it to the end. Stay tuned, because we’ll keep continuing providing more content on topics like this in the future.
Author: Rolf Schutten
Posted on: January 2, 2025